


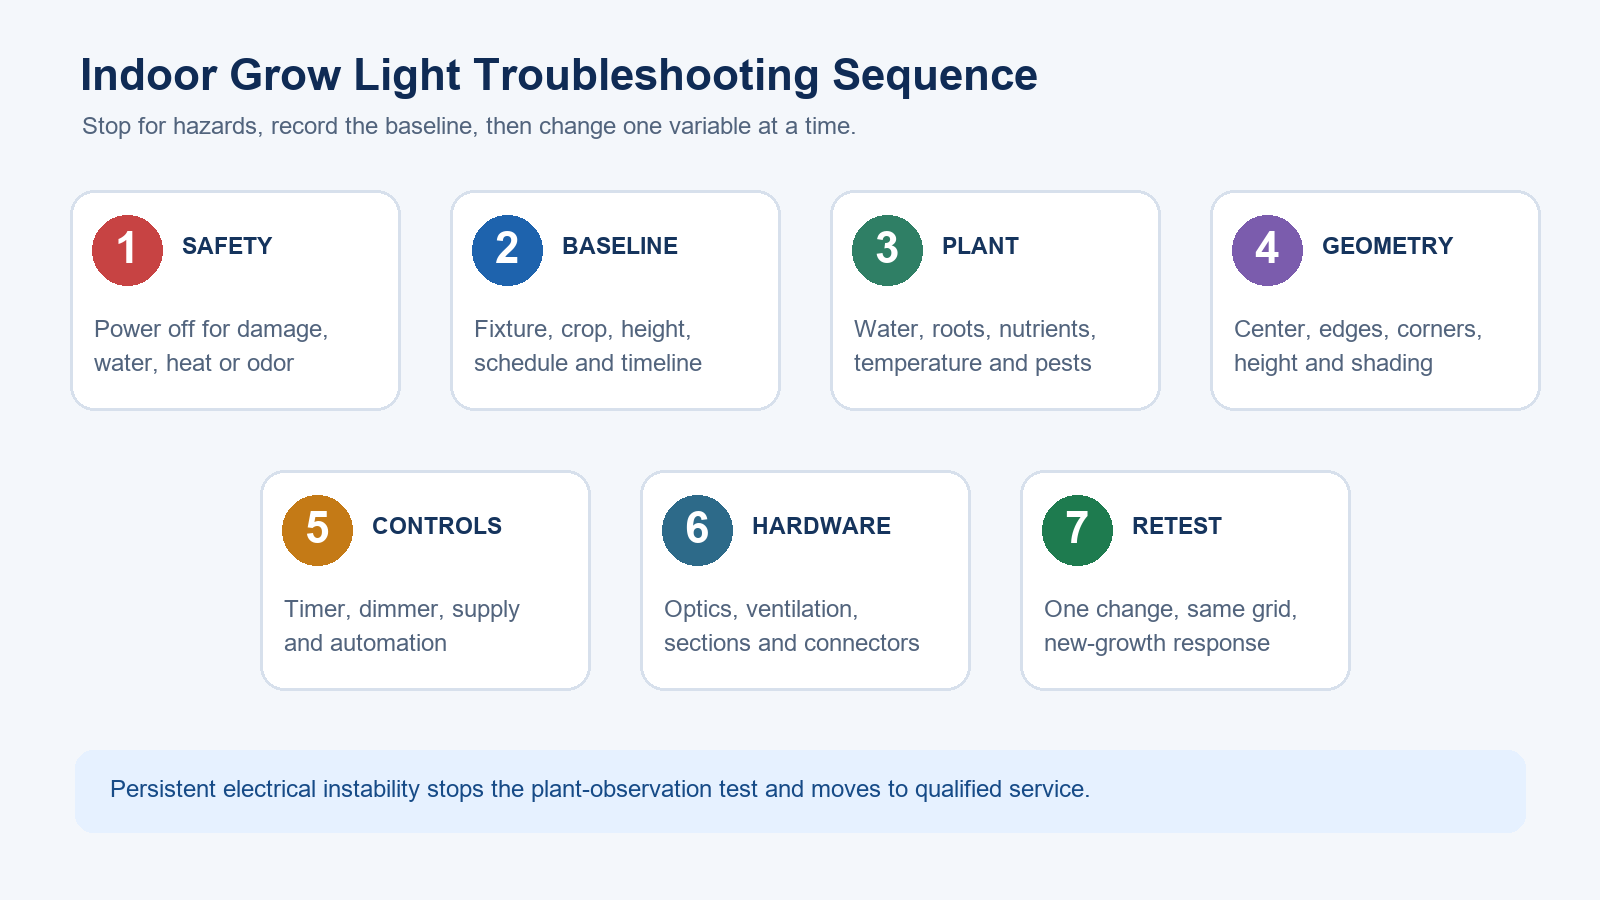
When plants stretch, lose color, grow unevenly or stop responding as expected, do not change the light immediately. The same visible symptom can be associated with light quantity, distribution, schedule, water, nutrition, temperature, roots, pests, disease or a recent environmental change.
Use a controlled sequence: stop for safety concerns, record the current setup, separate plant symptoms from hardware faults, test the most plausible variable and compare the result with the same measurement method. There is no single mounting height, PPFD target or photoperiod for every crop and fixture.
Stop First if There Is an Electrical Safety Concern
Disconnect the system and seek qualified help if you notice a damaged cable, loose connection, scorched component, repeated breaker operation, water inside an electrical enclosure, abnormal heat, smoke or a burning smell. Do not open a driver or energized fixture as part of plant troubleshooting.
Water and electricity share the same growing area. Keep irrigation and condensation away from electrical connections, preserve grounding and protective devices, and use equipment suitable for the actual environment. A plant symptom is never a reason to improvise a connection or bypass protection.
Build a Baseline Before Changing Anything
Record the plant or crop, growth stage, symptom start date, fixture and controller identity, fixture-to-canopy distance, daily schedule, affected positions, available daylight and recent environmental changes. Take photographs from the same position over several days.
If a suitable meter is available, record PPFD at canopy level in the center, edges and corners. Keep sensor height and orientation consistent. A phone app may help with relative comparisons, but do not treat an uncalibrated phone reading as model-grade horticultural data.
| Baseline item | Record | Why it matters |
|---|---|---|
| Plant context | Species or crop, cultivar if known, growth stage | Light needs and visual responses differ |
| Lighting system | Fixture, driver, dimmer, timer and controller | Connects symptoms to the actual system |
| Geometry | Emitting surface to canopy, fixture spacing, canopy size | Changes intensity and uniformity |
| Schedule | Actual on/off times plus daylight | Separates duration from instantaneous intensity |
| Measurement grid | Center, four corners and weak areas at one height | Reveals coverage differences hidden by one reading |
| Environment | Watering, nutrition, temperature, airflow and pests | Prevents a lighting-only diagnosis |
| Timeline | Date, photos and one-variable changes | Shows whether new growth responds |
This baseline prevents a common mistake: moving the fixture, extending the schedule, changing irrigation and adding nutrients at the same time. Even if growth improves, simultaneous changes do not reveal which action mattered.
Use the Symptom as a Starting Point, Not a Diagnosis
| Observation | Lighting checks | Other conditions to check |
|---|---|---|
| Stretching or leaning | Height, PPFD, edge coverage, shading, schedule | Species habit, temperature, crowding |
| Pale or yellow foliage | Output pattern, schedule, dirty optics, changed daylight | Water, roots, nutrients, pests, disease |
| Bleaching or dry upper edges | Closest canopy point, high-output zone, heat and airflow | Water stress, nutrition, disease |
| Strong center and weak edges | Corner readings, fixture spacing, canopy expansion | Uneven plant size or root conditions |
| Flicker or intermittent start | Supply, controller, dimmer, connectors and driver pairing | Escalate persistent electrical instability |
| Apparent output loss | Same-grid readings, optics, obstructions and control level | Denser canopy or reduced daylight |
The table narrows the next test; it does not identify a cause by itself. University of Missouri Extension notes that inadequate light and improper watering are both frequent problems for houseplants, while poor light may be associated with spindly shoots, few flowers, yellow foliage and little growth.
Plants Are Stretching or Leaning
Long internodes, thin stems or strong leaning can be consistent with insufficient or uneven light. Check the geometry first: measure fixture-to-canopy distance, compare center and edge coverage, look for taller plants shading shorter ones, and confirm that the fixture has not been raised while the plants remained at the same level.
Light intensity at the canopy changes with distance, but the correct response is not automatically to lower the fixture. Output, distribution, heat, plant stage and the fixture maker’s guidance all matter. Reposition in small controlled steps and evaluate new growth; old stretched stems will not reverse.
Leaves Look Pale, Yellow or Growth Is Slow
Before increasing light, review watering history, root condition where appropriate, nutrient management, temperature and pest evidence. Compare the age and position of affected leaves. If only one species or container is affected while neighboring plants remain normal, a lighting-wide cause becomes less likely.
Then check whether mounting height, canopy density, schedule or seasonal daylight changed; whether optical surfaces are dirty; whether one section has lost output; and whether symptoms concentrate at the perimeter. If the light pattern and symptom pattern align, make one measured correction. Do not sharply raise intensity and extend the photoperiod at the same time.
Upper Leaves Bleach, Curl or Develop Dry Edges
Stress concentrated near the top of the canopy may be associated with excessive light, heat or both, but overlapping symptoms have other causes. Measure the closest canopy point, compare the affected area with the fixture’s high-output zone, and look for a hot microclimate caused by poor air movement or blocked ventilation.
Do not use room temperature alone as proof that the canopy is cool. LEDs and drivers still release heat into the growing environment. If the exact product has documented dimming or mounting guidance, make a small change within that evidence and observe new growth.
Growth Is Strong in the Center but Weak at the Edges
A single center reading can hide inadequate perimeter coverage. Build a grid at canopy level and compare the center, four corners and visibly weak locations using one sensor orientation and height. University of Missouri Extension’s current grow-light guidance likewise uses corner and center measurements when calculating average PPFD.
Possible corrections include changing fixture spacing, repositioning plants by light requirement, adjusting height within verified limits or revising the number and arrangement of fixtures. Rotating houseplants may balance appearance, but it does not correct an inadequate fixed production layout. The horticultural grow-light layout planning guide explains how mounting geometry and measurement grids support a more complete design.
The Schedule Is Inconsistent or the Dark Period Has Changed
Verify the timer against an independent clock. Check day settings, power interruptions, daylight-saving changes, manual overrides and competing automations. Record natural daylight because the lamp schedule is only one part of the daily light received.
Do not assume that longer operation always compensates for low intensity. PPFD describes the photon flux density at a point, while daily light integral connects photon flux with time. Crop and growth stage determine the useful target, and some plants also respond to day length and dark-period continuity. Use crop-specific guidance and measured fixture data rather than one universal hour count.
For decisions about spectral distribution rather than troubleshooting, use the separate full-spectrum versus red-blue grow-light comparison.
The Fixture Flickers, Pulses or Starts Intermittently
Visible flicker, unstable output or delayed starting can involve the supply, driver, dimmer, controller or connection. U.S. Department of Energy guidance explains that LED flicker depends on driver design and may be affected by dimmers and other electronics.
Start with non-invasive checks: confirm the declared input conditions, review timer and controller settings, inspect accessible plugs and connectors with power disconnected, compare startup with warm operation, and record a video with the exact conditions. Phone-camera banding may indicate modulation, but a phone is not a calibrated flicker instrument and can create artifacts.
If instability persists, stop using the equipment and have the fixture, driver and control combination evaluated by qualified personnel. Do not substitute an unverified internal component.
Output Seems Lower Than Before
First separate real output change from a changed scene. A taller or denser canopy, greater mounting height, dusty optics, blocked light paths or reduced daylight can make the area look dimmer even when fixture output is unchanged.
With power disconnected and according to the manufacturer’s maintenance instructions, clean accessible optical surfaces and clear ventilation or heat-dissipation surfaces. Compare current measurements with the same baseline height and grid. Document whether one section or the entire fixture is affected, along with controller level and operating conditions.
Change One Variable and Recheck
After safety and baseline checks, state one hypothesis and define the test. Record the starting condition, change one controllable variable, keep other inputs stable where practical, allow an appropriate observation period, then photograph and measure again with the same method.
Plant response takes time, so evaluate new growth rather than expecting damaged tissue to recover immediately. Electrical instability is different: do not keep potentially faulty equipment energized merely to complete an observation period.
When to Escalate the Problem
Escalate immediately for electrical damage, abnormal heat, repeated protection-device operation, water ingress, smoke or burning odor. Escalate a performance problem when the fixture identity is known, the baseline is repeatable, environmental causes have been checked, and the measured pattern still differs from the product documentation or previous baseline.
For model matching or project review, compare the New Lights horticultural lighting range and home grow-light category. Provide photographs, model markings, crop and stage, canopy dimensions, mounting height, schedule, control method, measurement grid and symptom timeline when you contact New Lights.
Frequently Asked Questions
How far should a grow light be from indoor plants?
There is no universal distance. Use the fixture’s verified distribution data, the crop and growth stage, measured light at canopy level, heat conditions and observed response. Remeasure as the canopy grows.
How many hours should an indoor grow light run?
The schedule depends on crop, stage, natural light, PPFD at the canopy and the required dark period. Use crop-specific guidance and a reliable timer instead of applying one duration to every setup.
Why are seedlings stretching under a grow light?
Insufficient or uneven light is one possibility. Check height, coverage, shading, schedule and fixture output while also reviewing temperature, plant genetics and other environmental conditions.
Does yellow foliage mean the grow light is too weak?
Not necessarily. Poor light can contribute to yellowing and weak growth, but water, roots, nutrition, temperature, pests and disease can produce similar symptoms.
Should I replace a flickering grow light?
Stop first if there is any safety concern. Record the fixture, driver and control configuration and have qualified personnel evaluate persistent instability. Replacing one part without diagnosing the system may not solve the fault.
What should I provide for technical support?
Provide fixture, driver and controller identity; input supply; crop and stage; mounting height; schedule; canopy dimensions; photos; measurement method; symptom timeline; and recent changes.
Editorial Sources
- University of Missouri Extension, “Lighting Indoor Houseplants”: https://extension.missouri.edu/publications/g6515
- University of Missouri Extension, “Caring for Houseplants”: https://extension.missouri.edu/publications/g6510
- University of Missouri Extension, “Controlled Environment Agriculture: Understanding Grow Lights”: https://extension.missouri.edu/publications/g6987
- U.S. Department of Energy, “Flicker Basics”: https://www.energy.gov/cmei/ssl/flicker-basics
- U.S. Department of Energy, “Flicker Research”: https://www.energy.gov/cmei/ssl/flicker-research












