


 English
 Español
 Deutsch
We sincerely look forward to establishing a long-term development partnership with you with good quality and professional services.
Why Facilities Are Moving Away From Fluorescent Tubes
Fluorescent tube fixtures have lit warehouses, offices, and retail floors for decades, but the technology is reaching a natural end point. Ballasts fail, tubes flicker as they age, and the mercury content inside every fluorescent tube creates a disposal burden that most facility managers would rather avoid. LED Tubes address these issues directly by replacing the gas-discharge mechanism with solid-state diodes, removing the need for mercury, and cutting the failure points that cause fluorescent fixtures to flicker or dim unevenly over time.
The shift is not just about environmental compliance. A typical 4 ft fluorescent tube rated at 32 watts produces around 2,800 initial lumens, and that output drops by roughly 20 to 30 percent by the time the lamp reaches the middle of its rated life. A comparable linear LED replacement rated at 16 to 18 watts can produce 2,200 to 2,600 lumens on day one and maintain more than 90 percent of that output through 50,000 hours of operation. For buildings that run lighting 10 to 16 hours a day, that stability translates into fewer complaints about dim or yellowing light and fewer emergency tube swaps.
Facilities converting a 200-fixture space from 32 watt fluorescent tubes to 16 watt LED tubes typically see a reduction of 30,000 to 40,000 kWh in annual lighting draw, before accounting for reduced HVAC load from lower heat output.
There is also a labor argument that rarely gets discussed alongside the energy figures. A fluorescent fixture with a failing ballast often produces a visible symptom, such as flickering or a faint humming sound, well before the fixture stops working entirely. Diagnosing whether the problem is the tube, the starter, or the ballast itself typically requires a maintenance technician to test each component in sequence. LED tubes remove two of those three variables, since there is no starter and, in a bypass configuration, no ballast, which shortens troubleshooting time considerably when an issue does occur.
How T8 LED Tube Light Technology Differs From Fluorescent
A fluorescent tube generates light by exciting mercury vapor with an electric arc, which then strikes a phosphor coating to produce visible light. This process depends on a ballast to regulate current, and the arc itself degrades the phosphor coating over time, which is why fluorescent tubes dim gradually rather than failing outright. A t8 led tube light uses an array of surface-mounted diodes running along a linear circuit board, driven by a compact internal or external driver that converts incoming AC voltage to the low-voltage DC current the diodes require.
Because there is no arc and no phosphor degradation mechanism, LED tubes lose lumen output far more slowly. The practical difference shows up in three areas: startup behavior, dimming compatibility, and temperature sensitivity.
| Characteristic | Fluorescent T8 Tube | LED T8 Tube |
|---|---|---|
| Startup time | 1 to 3 seconds, flicker on cold start | Instant, no flicker |
| Cold weather performance | Reduced output below 10 degrees C | Stable output down to -20 degrees C |
| Dimming support | Requires dimming ballast | Depends on driver type, many support 0 to 10V dimming |
| Typical rated life | 20,000 to 24,000 hours | 50,000 to 70,000 hours |
| Mercury content | Present, requires special disposal | None |
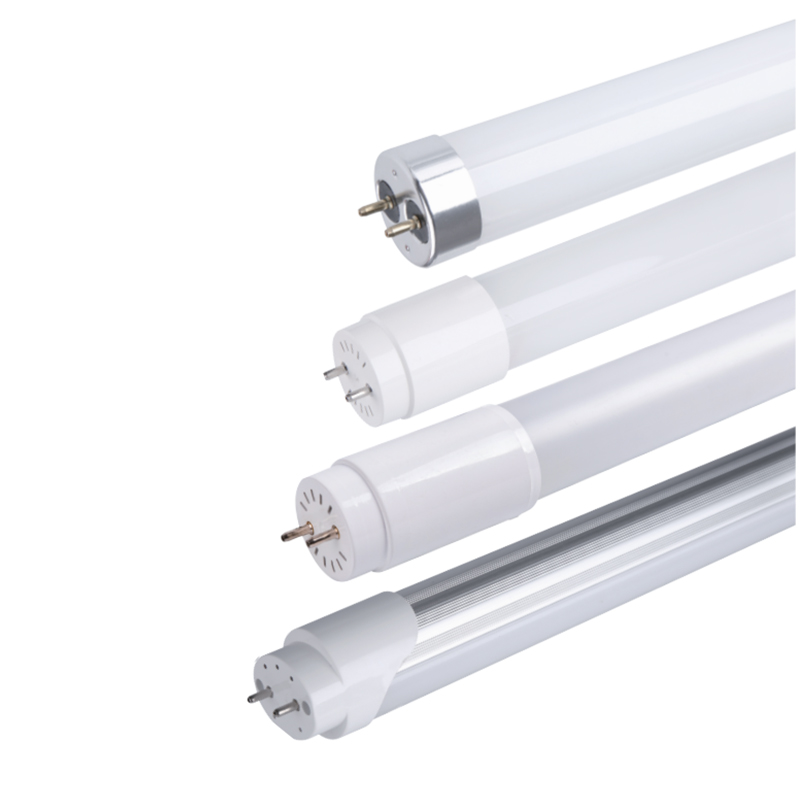
The absence of a warm-up period matters most in spaces with motion-sensor lighting, where fluorescent tubes struggle to reach full brightness before someone has already walked past the sensor zone. LED tubes reach full lumen output within a fraction of a second, which keeps motion-activated aisles and stairwells consistently lit.
Energy Savings and Lumen Output in Practical Terms
Wattage comparisons alone can be misleading, because lumen output per watt, known as efficacy, is what actually determines whether a space stays bright after conversion. A fluorescent T8 tube typically delivers 80 to 90 lumens per watt when new. A well-built LED tube delivers 130 to 160 lumens per watt, which is why a lower-wattage LED tube can match or exceed the visible brightness of a higher-wattage fluorescent tube.
Wattage Reduction
Converting a 32W fluorescent tube to an 18W LED tube cuts fixture wattage by roughly 44 percent while maintaining comparable brightness.
Heat Output
LED tubes release significantly less waste heat than fluorescent tubes, which reduces cooling load in conditioned spaces during warmer months.
Lumen Maintenance
Quality LED tubes are commonly rated to maintain 90 percent (L90) of initial output at 36,000 hours, compared to steady decline in fluorescent output.
For a rough payback estimate, take the wattage difference, multiply by daily operating hours and local electricity cost per kWh, then compare that annual savings figure against the incremental cost of the LED tube over a replacement fluorescent tube. Most commercial retrofits recover the price difference within 12 to 24 months of continuous use, after which the energy savings continue for the remainder of the LED tube's rated life.
Ballast Bypass vs Plug-and-Play: Choosing the Right Retrofit Path
This is the single most consequential decision in a fluorescent-to-LED conversion, because it determines both installation labor and long-term reliability. Plug-and-play LED tubes are designed to operate with an existing compatible ballast, so the tube installs exactly like the fluorescent tube it replaces. Ballast bypass tubes, sometimes called direct-wire tubes, connect straight to line voltage after the ballast has been removed or disconnected.
Plug-and-play tubes suit facilities that need a fast, low-disruption rollout across many fixtures, since maintenance staff can swap tubes without an electrician on site. The tradeoff is that the ballast remains a point of failure, and ballasts typically last 8 to 10 years, so a plug-and-play LED tube may still be interrupted by a ballast fault partway through its own rated life.
Ballast bypass tubes eliminate that failure point entirely and generally run at slightly higher efficacy because power is not lost to an intermediate ballast. The tradeoff is upfront labor: each fixture needs rewiring by a licensed electrician, and double-ended bypass tubes require both sockets to be wired to line voltage, which increases the risk of installation error if instructions are not followed precisely.
Step-by-Step Retrofit Installation Guide
The exact steps differ slightly between plug-and-play and ballast bypass conversions, but the overall sequence for a ballast bypass retrofit, which is the more involved of the two, follows this pattern:
- Shut off power to the fixture at the breaker and confirm with a voltage tester before opening the fixture housing.
- Remove the existing fluorescent tubes and set them aside for proper mercury-safe disposal.
- Disconnect the ballast from the socket wiring and remove it from the fixture housing.
- Identify whether the replacement tube is single-ended or double-ended power, since wiring differs between the two designs.
- Wire the line voltage directly to the appropriate tombstone sockets according to the tube manufacturer's wiring diagram.
- Cap and insulate any unused ballast wiring to prevent accidental contact.
- Install the LED tube, restore power, and confirm even, flicker-free illumination across the full fixture.
- Label the fixture as ballast-bypassed so future maintenance staff do not attempt to install a standard fluorescent tube by mistake.
Skipping the labeling step in the last stage is one of the most common causes of accidental fixture damage, since a fluorescent tube installed into a bypassed fixture will not light and can, in some wiring configurations, create a short circuit.
For facilities managing large-scale rollouts across dozens or hundreds of fixtures, it is worth staging the conversion by zone rather than converting an entire building at once. Starting with a single zone allows staff to confirm color temperature consistency, verify that beam angle suits the ceiling height, and catch any wiring issues on a small scale before committing to the full facility. A staged rollout also spreads electrician labor costs across multiple billing periods, which can ease budget planning compared to a single large capital expense.
Calculating Retrofit Return on Investment
A reliable payback estimate depends on four inputs: the wattage difference between the old and new tubes, the number of fixtures being converted, daily operating hours, and the local commercial electricity rate. The table below walks through a representative calculation for a mid-size facility running lights on an extended schedule.
| Input | Example Value | Role in Calculation |
|---|---|---|
| Fixtures converted | 150 | Scales the total wattage reduction across the facility |
| Wattage reduction per tube | 14W | Difference between 32W fluorescent and 18W LED tube |
| Operating hours per day | 12 | Determines total kWh saved daily |
| Electricity rate | Local commercial rate per kWh | Converts kWh saved into dollar savings |
Multiplying the wattage reduction by fixture count gives total wattage saved across the facility. Multiplying that figure by daily operating hours and dividing by 1,000 converts the result into daily kilowatt-hours saved, which can then be multiplied by the local electricity rate to produce a daily dollar savings figure. Extending that number across a full year, and comparing it against the incremental material and labor cost of the retrofit, typically produces a payback window of one to two years for facilities operating on extended schedules, and closer to two to three years for spaces with shorter daily operating hours such as standard office buildings.
Rebate programs offered by regional utility providers can shorten this window further, since many utilities offer per-fixture incentives for verified lighting efficiency upgrades. Checking for available rebates before purchasing tubes in bulk is a practical step that is easy to overlook during a retrofit project.
Maintenance and Lifespan Considerations After Conversion
Once a space has been converted, ongoing maintenance shifts from routine tube replacement to occasional driver or fixture-level troubleshooting. Because LED tubes rarely fail outright the way fluorescent tubes do, maintenance planning should focus on a smaller set of checks performed less frequently.
- Inspect fixtures annually for dust buildup on the tube surface, which can reduce measurable light output by 5 to 10 percent over several years.
- Check that end caps remain securely seated, particularly in fixtures exposed to vibration such as those near loading docks or heavy equipment.
- Monitor for any tubes that begin flickering, since this typically indicates a driver issue rather than a diode failure and often means the entire tube needs replacement rather than a component repair.
- Keep a small inventory of matching replacement tubes on hand, since color temperature and wiring type should match the original installation to avoid inconsistent lighting across a room.
Facilities that track lighting-related maintenance tickets before and after a fluorescent-to-LED conversion commonly report an 80 to 90 percent drop in tube-related service calls during the first two years, largely because there is no ballast to fail and no phosphor degradation causing gradual dimming complaints.
Selecting the Right 4 ft LED Light Bulb for Your Space
Not every LED tube is interchangeable, and choosing the wrong specification can lead to a mismatch in color, brightness, or beam spread. A few technical details are worth checking before ordering a 4 ft led light bulb for a retrofit project.
| Specification | What to Check | Why It Matters |
|---|---|---|
| Color temperature | 3500K, 4000K, or 5000K | Must match adjacent fixtures to avoid visible color inconsistency |
| Beam angle | Typically 120 to 340 degrees | Wider angles suit open ceilings, narrower angles suit deep troffers |
| Wiring type | Single-ended or double-ended | Determines how the fixture must be rewired for bypass installs |
| Certification marks | Relevant safety listings for the installation region | Confirms the tube meets electrical safety standards for commercial use |
| Base type | Medium bi-pin or single pin, matching socket type | Prevents physical fit issues at installation |
Glass tubes offer slightly better heat dissipation and a more familiar weight and feel to maintenance staff, while polycarbonate tubes are lighter, more impact resistant, and often preferred in facilities with higher vibration or accidental impact risk, such as warehouses with forklift traffic. Neither material affects lumen output meaningfully; the choice comes down to durability requirements and local disposal regulations for glass versus plastic components.
Frequently Asked Questions
Q1: Can any LED tube be installed into an existing fluorescent fixture without changes?
Only plug-and-play tubes are designed to work with an existing compatible ballast without rewiring. Ballast bypass tubes require the ballast to be removed and the sockets rewired to line voltage before installation.
Q2: How much brighter is an LED tube compared to the fluorescent tube it replaces?
Perceived brightness depends on lumen output rather than wattage. An 18W LED tube producing around 2,400 lumens will generally appear as bright or brighter than a 32W fluorescent tube rated at 2,800 initial lumens, since the fluorescent tube's output declines steadily while the LED tube maintains a stable level.
Q3: Do LED tubes work with existing dimmer switches?
Only if the LED tube is specifically rated for dimming and the fixture uses a compatible 0 to 10V or triac-based dimming driver. Standard fluorescent dimming ballasts are not compatible with most LED tubes and will typically cause flickering or failure to dim smoothly.
Q4: What happens to the old fluorescent tubes after a retrofit?
Because fluorescent tubes contain mercury, they should be taken to a certified recycling or hazardous waste facility rather than placed in general waste. Many regions require commercial facilities to document this disposal for compliance purposes.
Q5: How long does a typical LED tube retrofit take per fixture?
A plug-and-play swap typically takes two to three minutes per tube. A ballast bypass conversion, including rewiring, generally takes 15 to 25 minutes per fixture depending on accessibility and the number of tubes per fixture.
Q6: Will converting to LED tubes affect existing emergency lighting circuits?
Emergency or battery-backup ballasts require LED tubes rated as compatible with emergency circuits. Standard LED tubes installed into an emergency-rated fixture without confirming compatibility may not function correctly during a power interruption, so this should be verified before ordering tubes for any fixture tied to emergency lighting.
 GET IN TOUCH


